- 46 Posts
- 87 Comments
Yeah if the smart scope is just doing all the work and spitting out an image on its own that’s fine. Generally as long as you include any kind of info about your processing steps it’s fine, and you can have it be as brief or detailed as you want (I know mine are on the longer side).
Personally I’m all for more detail = better. It’s a lot easier for people to give constructive criticism, and a good enough writeup can serve as a guide for those just learning how to process (and I’m always going back to my old posts just to remember how the hell I even processed a tricky image)
Hi OP can you include acquisition/processing info per rule 5?
Hi OP can you include acquisition/processing info per rule 5?
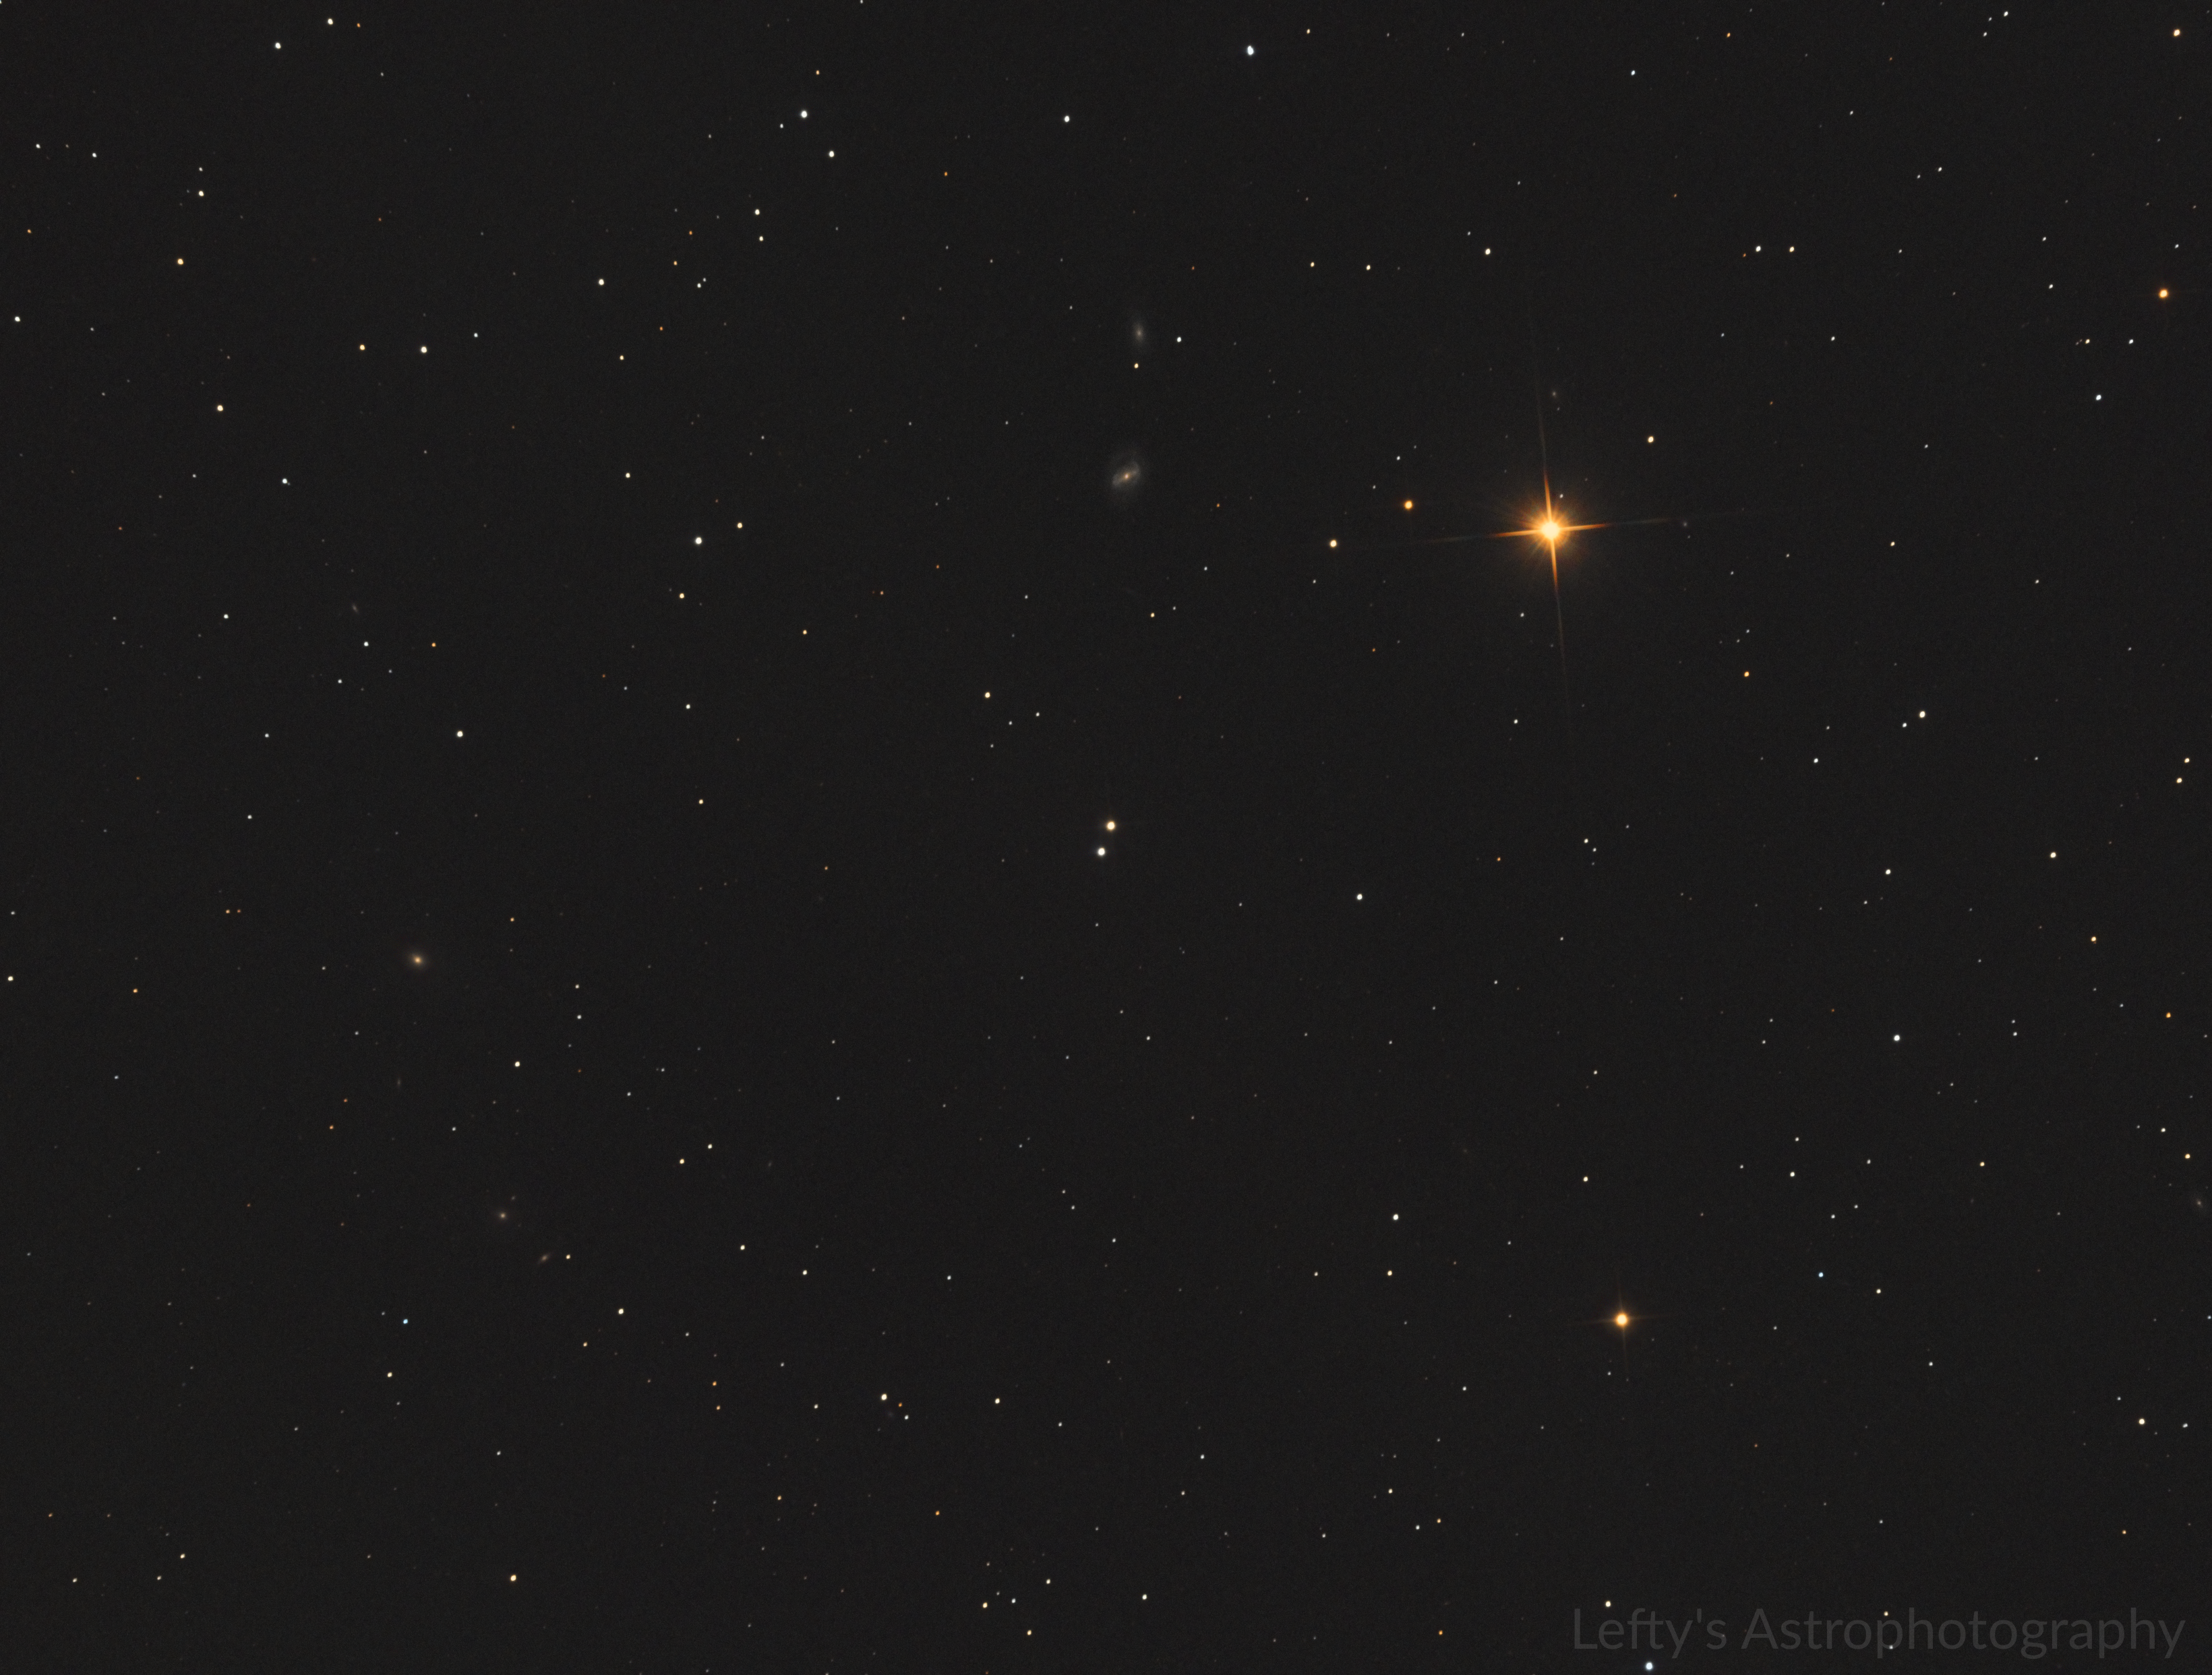
Sh2-64 is the red nebula to the right of the image. It frames up pretty well with the more golden stars seen in the milky way core. I probably should’ve gotten more exposure time to help bring out some of the dark nebula details, but it was only clear for one night at the dark site (at least the night went perfectly, which is rare for trips out to the middle of nowhere). Captured on June 7th, 2024 from a Bortle 3 zone (Deerlick Astronomy Village)
Places where I host my other images:
-
TPO 6" F/4 Imaging Newtonian
-
Orion Sirius EQ-G
-
ZWO ASI1600MM-Pro
-
Skywatcher Quattro Coma Corrector
-
ZWO EFW 8x1.25"/31mm
-
Astronomik LRGB+CLS Filters- 31mm
-
Astrodon 31mm Ha 5nm, Oiii 3nm, Sii 5nm
-
Agena 50mm Deluxe Straight-Through Guide Scope
-
ZWO ASI-290mc for guiding
-
Moonlite Autofocuser
Acquisition: 5 hours 44 minutes (Camera at half unity gain -15°C)
-
L - 76x120"
-
R - 32x120"
-
G - 32x120"
-
B - 32x120"
-
Darks- 30
-
Flats- 30 per filter
Capture Software:
- Captured using N.I.N.A. and PHD2 for guiding and dithering.
PixInsight Preprocessing:
-
BatchPreProcessing
-
StarAlignment
-
ImageIntegration per channel per panel
-
DrizzleIntegration (2x, Var β=1.5)
-
Dynamic Crop
-
DynamicBackgroundExtraction
Luminance Linear:
-
BlurXterminator (Correct only)
-
NoiseXterminator
-
HistogramTransformation + sketchpad’s iHDR script (low preset) to stretch to nonlinear
RGB Linear:
-
ChannelCombination to combine monochrom R G and B stacks into color image
-
SpectrophotometricColorCalibration
-
BlurXterminator (correct only)
-
HSV repair
-
ArcsinhStretch + iHDR script (low preset) to stretch to nonlinear
Nonlinear Processing:
-
LRGBCombination using stretched L as luminance
-
DeepSNR
-
Various curve adjustments for lightness, contrast, hue, saturation, etc (with varying lum/star masks)
-
Slight SCNR green
-
ColorSaturation to boost the saturation of the Ha region
-
More curves
-
NoiseXterminator
-
invert > SCNR > invert to remove some magentas
-
LocalHistogramEqualization
two rounds at scale 16 and 132 to target different sized structures
-
LOTS more curve adjustments
-
MultiscaleLinearTransform for chrominance noise reduction
-
Even more curves
-
Resample to 60%
-
Annotation
-
 3·22 days ago
Omega Centauri is the largest globular cluster in the sky and contains about 10 million stars, but it’s generally considered a southern hemisphere target since it’s at -47 declination. It was right at the meridian for me while waiting for it to get completely dark out, so I tried shooting it at just 9 degrees up. Had to do short exposures without guiding, because even the dim flashlights of the other campers with me would overwhelm my guide camera. Captured on June 7th, 2024 from a Bortle 3 zone (Deerlick Astronomy Village)
Places where I host my other images:
-
TPO 6" F/4 Imaging Newtonian
-
Orion Sirius EQ-G
-
ZWO ASI1600MM-Pro
-
Skywatcher Quattro Coma Corrector
-
ZWO EFW 8x1.25"/31mm
-
Astronomik LRGB+CLS Filters- 31mm
-
Astrodon 31mm Ha 5nm, Oiii 3nm, Sii 5nm
-
Agena 50mm Deluxe Straight-Through Guide Scope
-
ZWO ASI-120MC for guiding
-
Moonlite Autofocuser
Acquisition: 12 minutes (Camera at half Unity Gain, -15°C)
-
Lum - 20x10"
-
Red - 11x15"
-
Green - 13x15"
-
Blue - 12x15"
-
Flats- 30 per filter
Capture Software:
- Captured using N.I.N.A.
PixInsight Processing:
-
BatchPreProcessing
-
StarAlignment
-
ImageIntegration
-
DrizzleIntegration (2x, Var β=1.5)
-
DynamicCrop
-
DynamicBackgroundExtraction
duplicated each image and removed stars via StarXterminator. Ran DBE with a shitload of points to generate background model. model subtracted from original pic using the following PixelMath (math courtesy of /u/jimmythechicken1)
$T * med(model) / model
Luminance:
-
BlurXTerminator (correct only mode)
-
ArcsinhStretch + histogramtransformation to bring nonlinear
RGB:
-
ChannelCombinaiton to combine monochrome R, G, B stacks into color image
-
BlurXTerminator (correct only mode)
-
SpectroPhotometricColorCalibration
-
HSV Repair
-
MMT for large scale chrominance noise reduction
-
ArcsinhStretch + histogramtransformation to bring nonlinear
Nonlinear:
-
LRGBCombination with stretched L as luminance
-
Several CurveTransformations to adjust lightness, contrast, colors, saturation, etc.
-
DeepSNR Noise reduction
-
HistogramTransformations
-
More curves
-
Resample to 70%
-
Annotation
-
Wasn’t expecting much with the last night’s geomagnetic storm, but seeing the aurora come in on the camera was definitely an “oh shit” moment for me and my wife, especially when it got overexposed. The initial burst in the gif was very noticeable to the naked eye, despite our light pollution. Sadly it died down a bunch, but seems to have come back (although not as strong) after 3am (video timestamp is in UTC). Tonight definitely wont be as strong, but I’m hoping the camera might pick something up on another timelapse. Captured on May 10th, 2024 from Atlanta, GA
(probably) Better quality version on youtube
Places where I host my other images:
Equipment:
- ASI290mc + the all sky lens it comes with
Acquisition:
- looped 15" exposures at gain 160
Capture Software:
- Sharpcap
Processing:
- just PIPP to debayer and handbrake to convert it
deleted by creator
Hello, OP! Please include ALL acquisition and processing details.
Hello, OP! Please include ALL acquisition and processing details.
Timestamp is UTC
Definitely the lights. I got them in Atlanta too
Hi, OP! Please include ALL acquisition and processing details
Was any processing done to this?
Could you edit your equipment out of your title?
Also any and all astro photos are allowed here, regardless of how “low effort” they are (as long as they follow the couple rules on the sidebar. I don’t want there to be any kind of arbitrary minimum quality standard to prevent people from posting their space photos on here.
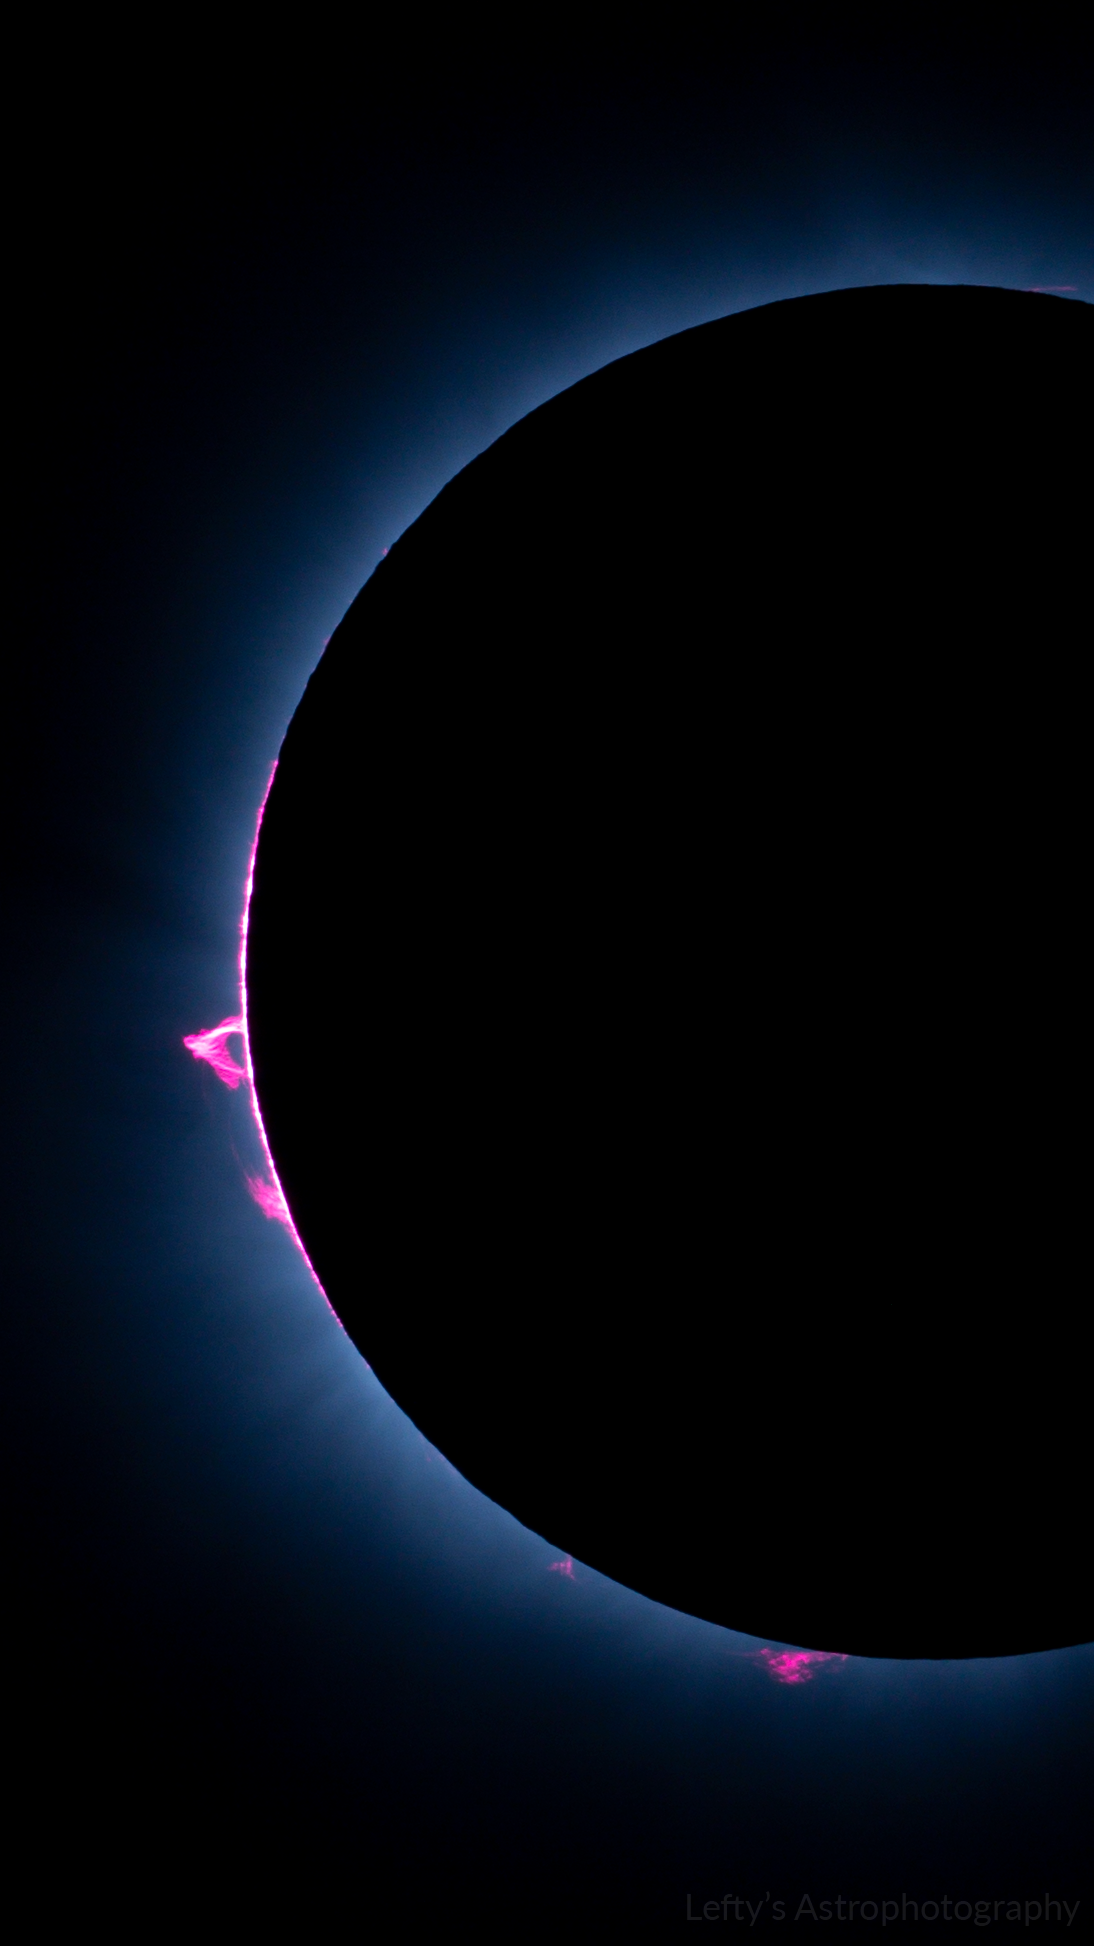
Finally done with classes and I got some time to at least star processing my pics. Gonna be a while before I figure out all the HDR stuff, so here’s a pic of the prominences about 10 seconds before C3. It was absolutely nutty seeing them naked eye during the eclipse, and visually through my other telescope. Captured on April 8th, 2024 from Sikeston, MO.
Places where I host my other images:
-
TPO 6" F/4 Imaging Newtonian
-
Orion Sirius EQ-G
-
Canon T3i (Ha modded)
-
Skywatcher Quattro Coma Corrector
-
Moonlite Autofocuser
Acquisition:
- Single 1/4000" exposure at ISO 100
Capture Software:
-
Eclipse Orchestrator Free for automating the capture sequence
-
NINA for controlling the mount and autofocuser
- Crop, and some minor adjustments to exposure, contrast, shadows, whites, and blacks, and slight S curve
-
Hi OP, this community is for amateur/original content only, not professional photos.
Thanks to my north facing balcony, I can only photograph the moon when it’s at high declinations. Fortunately it was at +27 dec the other day, and it was early enough for me to be awake to shoot it! Captured at 10pm on April 12th, 2024.
Places where I host my other images:
-
TPO 6" F/4 Imaging Newtonian
-
Orion Sirius EQ-G
-
ZWO ASI1600MM-Pro
-
Skywatcher Quattro Coma Corrector
-
ZWO EFW 8x1.25"/31mm
-
Astronomik LRGB+CLS Filters- 31mm
-
Astrodon 31mm Ha 5nm, Oiii 3nm, Sii 5nm
-
Agena 50mm Deluxe Straight-Through Guide Scope
-
ZWO ASI-120MC for guiding
-
Moonlite Autofocuser
Acquisition: (Camera at Unity Gain, -15°C)
-
R - 20000 x 5.4ms
-
G - 2000 x 4.3ms
-
B - 2000 x 6.0ms
Capture Software:
- Captured using Sharpcap and N.I.N.A. for mount/filterwheel control
Stacking:
- Stacked the best 25% of frames in Autostakkert (autosharpened, 3X Drizzle)
PixInsight Processing:
-
DynamicCrop
-
ChannelCombination to combine monochrome images into RGB image
-
ChannelMatch to align G and B color channels to red
-
ColorCalibration
-
HistogramTransformation (slight stretch)
-
SCNR > invert > SCNR to remove green and magenta color fringing
-
CurvesTransformations to adjust lightness, contrast, colors, saturation, etc.
-
Very slight convolution to hide some drizzle artifacts
-
LocalHistogramTransformation
-
dynamic crop
-
Annotation
-
This is an animation of every 1/4000" frame I took during/around totality. For most of totality I was looping HDR sequences and had one of these frames roughly every 15 seconds, but around each contact I bursted these short frames to get the beads. The animation lasts for the entirety that my solar filter was off, which was about 13 seconds before/after each contact. I think it’s cool seeing the motion of the moon relative to the sun like this. Since imgur compression is kinda shit, here’s a (slightly) less compressed version on youtube.
Captured on April 8th, 2024 from Sikeston, MO.
Places where I host my other images:
-
TPO 6" F/4 Imaging Newtonian
-
Orion Sirius EQ-G
-
Canon T3i (Ha modded)
-
Skywatcher Quattro Coma Corrector
-
Moonlite Autofocuser
Acquisition:
- Single 1/4000" exposure at ISO 100
Capture Software:
-
Eclipse Orchestrator Free for automating the capture sequence
-
NINA for controlling the mount and autofocuser
Processing:
-
Manually aligned the frames in photoshop based on the prominences
-
Exported frames as tiffs
-
PIPP to make final gif at 16fps
-
Which phone cam did you use?
I’m guessing it’s called that because it’s kinda headphone shaped. It was discovered in the 30’s so I’m assuming only the brightest parts of the nebula were visible to the astronomers.
This image is a combination of false color narrowband images for the nebula itself, plus true color RGB stars (the nebula is mostly red and a little blue in true color). If you zoom in to the center you can see the very blue white dwarf that caused the planetary nebula to form. Also for those curious this is what a single 10 minute long Ha exposure looks like (image total is 83.5 hours exposure). Captured over 33 nights from Jan-May 2024 from a bortle 9 zone.
Places where I host my other images:
Flickr | Instagram
Equipment:
TPO 6" F/4 Imaging Newtonian
Orion Sirius EQ-G
ZWO ASI1600MM-Pro
Skywatcher Quattro Coma Corrector
ZWO EFW 8x1.25"/31mm
Astronomik LRGB+CLS Filters- 31mm
Astrodon 31mm Ha 5nm, Oiii 3nm, Sii 5nm
Agena 50mm Deluxe Straight-Through Guide Scope
ZWO ASI-290mc for guiding
Moonlite Autofocuser
Acquisition: 83 hours 30 minutes (Camera at -15°C), NB exposures at unity gain and BB at half unity
Ha - 238x600"
Oiii - 247x600"
R - 54x60"
G - 53x60"
B - 54x60"
Darks- 30
Flats- 30 per filter
Capture Software:
PixInsight Preprocessing:
BatchPreProcessing
StarAlignment
Blink
ImageIntegration per channel
DrizzleIntegration (2x, Var β=1.5)
Dynamic Crop
DynamicBackgroundExtraction 3x
Narrowband Linear:
Blur and NoiseXTerminator
StarXterminator to completely remove stars (to be later replaced by the RGB ones)
ArcsinhStretch to slightly stretch nonlinear
iHDR 2.0 script (low preset) to stretch each channel the rest of the way.
RGB Linear:
ChannelCombination to combine monochrome R G and B frame into color image
SpectroPhotometricColorCalibration
BlurXTerminator for star sharpening (correct only)
HSV Repair
StarXterminator to generate a stars-only image
ArcsinhStretch + HT to stretch nonlinear (to be combined with starless narrowband image later)
Invert > SCNR > invert to remove magentas
Curves to saturate the stars a bit more
Nonlinear:
NoiseX again
Background Neutralization
Shitloads of Curve Transformations to adjust lightness, hues, contrast, saturation, etc
even more curves
Pixelmath to add in the stretched RGB stars only image from earlier
Couple final curves
Resample to 65%
DynamicCrop
Annotation